Heaters Gonna Heat: Choosing A Construction Heater To Beat The Cold

The approaching winter brings additional challenges for the construction industry. Frozen ground and cold air can lead to downtime on a job site. Follow this guide to find which construction heaters are the right ones for your needs, based on your jobsite’s scope, size, location, power availability, and more.

Forced-Air Construction Heaters

The most common variety on most jobsites, forced-air heaters deliver heat either by blowing air across an open flame (direct-fired) or pulling it across a heat exchanger (indirect-fired). Fans blow the hot air into the space to be heated or ducts convey it to specific locations.

  1. Direct-fired models are more efficient, transferring 100 percent of the flame’s energy to the air. Because the flame is exposed, however, these heaters are best suited for uncluttered, well-ventilated spaces and on projects that will not be affected by the moisture they produce.
  2. Indirect-fired heaters, conversely, are best in closed spaces and when clean, dry air is a must – drywall installation, for instance. Pro Tool and Supply carries top-of-the-line HeatStar forced-air heaters running on propane or kerosene.

Infrared Construction Heaters

infrared heater

Infrared energy is radiant. It directly heats what it hits – floors, equipment, and people – without wasting any on the surrounding air. That makes them well-suited for use on outdoor jobsites. Cold rain will not diminish the infrared heat, and wind from open doorways will not dissipate it.

Pro Tool and Supply is proud to carry the KBE5L infrared heater from Val6. It produces efficient, odorless, smokeless heat, consistent heat, using a preheater to keep the fuel flowing smoothly in frigid conditions.

Electric Construction Heaters

Fan elements on portable salamander- and milkhouse-style electric heaters continually push indoor air over several hot coils, continually heating it until it reaches the desired temperature. Electric heat is clean, dry and fume-free and can be ducted to specific areas. They are highly portable, making them perfect for use under decking and inside concrete enclosures. One drawback is that that heating with electricity often is more expensive than using propane or kerosene, and the 3-phase high-voltage electrical outlets many models require may not be available.

The Fostoria electric heaters Pro Tool and Supply carry can easily increase temperatures by 30 to 45 degrees Fahrenheit; The Fostoria 3048-3 model puts out more than 100,000 BTUs and can raise air temperature by 90 degrees.

Hydronic Construction Heaters

hydronic ground construction heaters

Using portable propane- or oil-fueled boilers to heat fluid and pump it through serpentine tubing that acts as a heat exchanger, hydronic heaters have traditionally been used to thaw frozen ground and maintain concrete at optimal curing temperature.

The Wacker Neuson ground heaters from Pro Tool and Supply deliver dry heat through 1,100 to 5,000 feet of hose, enough to thaw up to 10,000 square feet and heat as much as 1.7 million cubic feet of ambient air. To heat the air, simply point fans across the heated coiled hose and into the work area.

Keep Your Jobsites Moving With Construction Heaters

Keep your construction projects humming along, no matter what the weather throws your way. Shop our large inventory of construction heaters for both supply and rent to keep your jobsite moving. Our representatives are ready to help you heat all your winter jobs. Request a Quote or call us at 1-844-671-2956 learn more about our complete selection of construction heaters.

concrete-grinder

3 Things to Consider When Renting Concrete Floor Grinders

Whether they will be left bare or used as a substratum for tile, carpet, or linoleum, concrete floors must be properly prepared to ensure long life and optimal performance. A concrete floor grinder rental offers an efficient, economical way to level new floors, repair existing slabs, remove old coverings, and more.

Use this guide to select the proper concrete floor grinder rental in order to ensure success with your next project.


1. Head Count

Floor grinders get the job done by scraping the concrete surface with rotating discs mounted onto the bottom of the equipment. The number of disks determines not only the area that can be ground with each pass of the machine, but also the best application for the machine.

  • concrete grinder rentalOne Head: With a small footprint, these grinders work best in corners, against walls, and in other tight spaces. However, their gear-driven rotary disc rotation gives them aggressive grinding action that can leave irregular scratch patterns, making them inapt for floor polishing.
  • Two Heads: The extra head gives more floor coverage, saving time. With the rotary machines’ weight concentrated on just two heads, there is plenty of pressure to effectively grind the surface and obliterate thick paint and adhesives.
  • Three Heads: Perhaps the best option for all-around performance, the three-head configuration distributes the machine’s weight providing greater balance, while still creating sufficient mass to ensure strong grinding. The additional head means large surfaces can be covered quickly. Three heads and the use of planetary action also makes these machines a better option for polishing concrete floors.
  • Four Heads: While still a strong option for grinding large surfaces in a short time, four-headed grinders exert even less pressure on each spinning head, adding to the machines’ effectiveness at polishing. Two heads spinning clockwise and two counterclockwise, negating excessive torque and the effort necessary for the operator to keep the grinder in line, cutting down on fatigue.


2. Power and Size

The wider a floor grinder’s working dimension – the amount of floor it can cover with each pass – the less time it should take to finish the job.

husqvarna concrete grinder rentalsThe machine’s size to some extent is dictated by the number of heads. In turn, the size and grinding intensity determines how much power is required to run it. Grinding intensity takes into account the machine’s gross weight, the amount of contact between the grinding tools and the concrete, and the grit rating of the tools. Coarser grits and more surface contact increases resistance and requires more power to achieve results.


3. Safety and Health

Operating all equipment safely is the first order of business on any project. While concrete floor grinder rentals are not particularly dangerous, they can present health concerns if not operated properly:

  • Ventilation: Gas usually offers the most consistent and available power source for concrete floor grinders, but electricity or propane should be used in all indoor and poorly ventilated areas.
  • Dust Control: Users have two options for keeping irritating dust out of the air during grinding operations. Many rental grinders come with built-in vacuum capabilities, while others are capable of accepting separate vacuum units. Other grinders include a water tank. Wet grinding tamps down much of the dust as it is created. The wet dust is then vacuumed into the grinder, where it can be disposed of properly.
  • Personal Protection: Users should always wear respirators, sturdy shoes, and eye and ear protection when operating a floor grinder. Avoid loose clothing that can potentially get caught in the grinder disks.


Browse our Concrete Floor Grinder Rentals

Browse our selection of concrete floor grinder rentals which include models from Husqvarna and Edco. Still not sure which concrete floor grinder rental is right for you? Call The Pro Group at 1-888-776-0007 to speak with a representative who can help you select the concrete floor grinder rental that’s right for you. Rentals are available from one day to long-term.

concrete-chipping

Mastering the Art of Concrete Chipping with Pro Tool and Supply

For those working in construction or demolition, it’s crucial to have appropriate tools, like chipping hammers, for efficient breakdown of concrete, brick, and stone surfaces. However, with numerous chipping hammer models available, selecting a suitable one can be challenging. Fortunately, The Pro Group offers an extensive line of quality air tools from renowned brand Chicago Pneumatic – perfect for all your concrete chipping needs!

What is A Chipping Hammer?

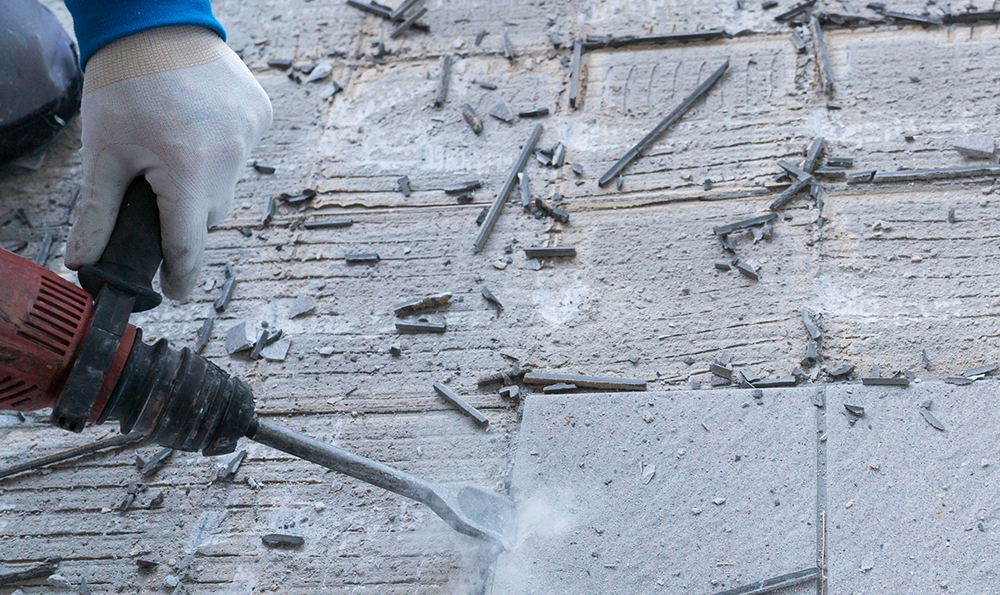
A chipping hammer is a tool commonly used in construction, demolition, and renovation industries for tasks like removing or altering concrete, stone, or metal. Its main feature is the ability to deliver successive blows to a chisel or similar tool, allowing it to chip away at materials effectively.

Key Components

The Handle

The handle is usually ergonomically designed to provide a comfortable grip for the user, reducing fatigue and enhancing productivity. This design consideration is especially crucial given the manual intensity of tasks where chipping hammers are typically employed.

The Head

The head of the chipping hammer is the part where a chisel or other shaping tool is attached. It’s built to endure forceful impacts and is typically crafted from sturdy materials like hardened steel. The tool attached to the head can vary based on the task, with different shapes and sizes available. A pointed chisel, for instance, is useful for breaking apart concrete, whereas a flat chisel can be used to shape or refine a surface.

The Air-Operated Piston

The chipping hammer is powered by an air-operated piston that rapidly moves back and forth. This piston is driven by compressed air, providing consistent and powerful blows to the tool at the hammer’s head. The rate and power of the blows can be adjusted to match specific tasks, making the chipping hammer effective and versatile. 

The tool’s effectiveness and versatility are due to the pneumatically operated piston mechanism. To operate the chipping hammer properly, you need to control the airflow to the piston. Usually, this is done through a separate valve or mechanism. 

By controlling the mechanism, you can adjust the power and frequency of the hammer’s blows, which makes it more versatile for different tasks.

How Are Chipping Hammers Used?

They are typically used for the following applications:

  1. Demolition: Chipping hammers are often employed to break down structures or surfaces made of concrete, brick, or other sturdy materials. For example, they may be used to remove a concrete patio, a brick wall, or a stone walkway.
  2. Construction: During construction projects, chipping hammers can be used to make adjustments to concrete structures or surfaces. If a concrete slab isn’t quite fitting correctly or a concrete wall needs an opening for a window, a chipping hammer can be used to make the necessary alterations.
  3. Renovation: In renovation projects, chipping hammers are invaluable for removing old flooring, such as tile or concrete, or for taking out old concrete countertops.
  4. Scraping and Cleaning: Chipping hammers can also be used to clean surfaces, particularly to remove rust, scale, or old paint from metal surfaces, as well as for the removal of slag after arc welding.

Choosing the Right Chipping Hammer

When choosing the right chipping hammer, several factors need to be taken into consideration. The power source is one of the first things to consider. Chipping hammers can be powered by electricity, pneumatic pressure, or even manually, each having its own advantages and disadvantages.

Power Sources of Chipping Hammers

Electric hammers offer constant power but require access to an electricity source, while pneumatic hammers provide greater power but require a compatible air compressor. Manual hammers give the most control but can be physically demanding.

Ease of Handling

The weight of the chipping hammer is also important. Lighter hammers are easier to handle and maneuver, especially for tasks requiring precision or extended use, but heavier hammers offer more power for hard materials.

Finding a Comfortable Grip

Ergonomics should never be overlooked. A well-designed hammer reduces user fatigue and increases safety and productivity. Look for features like shock-absorbing handles, comfortable grip, and a well-balanced design.

How Will the Hammer Be Used?

Lastly, consider the intended use of the hammer. For example, lighter chipping hammers might be sufficient for tasks like removing tiles or light masonry work, but for heavier jobs like breaking up concrete or brickwork, a heavier, more powerful hammer is required. Matching a chipping hammer to a specific task or material is vital to ensure efficient and effective work. 

For example, for precision tasks or softer materials, a lighter, easy-to-control hammer is ideal. In contrast, for breaking up harder materials like concrete, a heavier, more powerful hammer would be a better choice. Always consider the tool’s specifications and performance capabilities outlined by the manufacturer before making your decision.

Introducing Chicago Pneumatic: The Market Leader in Chipping Hammers

Chicago Pneumatic, a world-renowned brand known for its robust and durable air tools, offers a wide variety of chipping hammers. The brand stands for performance, durability, and reliability, qualities perfectly reflected in its chipping hammer models.

CP 4123 CR 3R Chipping Hammer

This chipping hammer from Chicago Pneumatic is built for heavy-duty applications. The CP 4123 CR 3R model stands out for its robust design and unrivaled durability. Equipped with a specially designed ergonomic handle, it ensures comfortable handling and less vibration for users, thereby reducing fatigue during long work sessions.

CP 4131 3R Chipping Hammer

The CP 4131 3R model is designed for maximum efficiency and ease of use. Its lightweight structure does not compromise on power, making it ideal for concrete, stone, and masonry removal. The ergonomic design guarantees user comfort and safety, while its robust nature ensures a long-lasting performance.

CP 4131 Chipping Hammer

The CP 4131 model stands true to the Chicago Pneumatic’s promise of durability and performance. Its compact design and easy maneuverability make it perfect for tackling intricate chipping tasks. With less vibration and high impact power, this model ensures a faster and more effortless chipping process.

Safety First

Safety is paramount when using a chipping hammer. Operators should always use appropriate safety gear, including safety glasses, gloves, and steel-toe boots, and should be trained in the proper use of the tool to prevent accidents and injuries. It’s also important to regularly inspect and maintain the tool to ensure it’s in good working condition.

The Pro Group: Your Go-To Destination for Top-of-the-Line Construction Tools

When it comes to construction tools, you deserve nothing but the best. That’s why The Pro Group offers an extensive range of quality tools from industry-leading brands like Chicago Pneumatic and RNP Industries. Don’t compromise on safety, productivity, or efficiency. Reach out to The Pro Group today for more information on their complete product line. Request a quote or call 1-888-776-0007 to speak to a representative and discover how their tools can revolutionize your construction process.
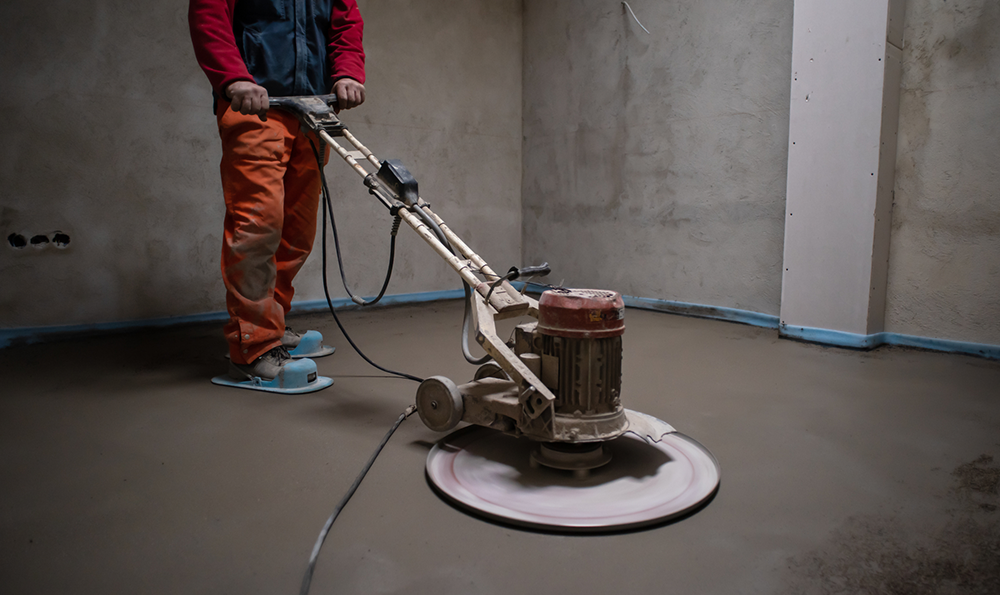
soil-compaction

Soil Compaction Methods and Equipment

Soil compaction is an essential step for increasing soil density, eliminating air pockets and maximizing ground load-bearing capacity. The compaction process must be tailored to the particular characteristics of each soil type – such as dirt, clay, sand or gravel. This article will cover ideal techniques and machines designed specifically for compacting various soils appropriate to construction projects like paver installations, sidewalks, patios and driveways.

When is Soil Compaction Needed in Construction Projects?

Soil compaction is often needed in construction projects to provide a stable and strong foundation for structures, roads, and other infrastructure elements. Proper soil compaction ensures that the ground can support the weight of the structures built upon it and prevent uneven settling, which can lead to structural damage. There are several situations when soil compaction is required in construction projects:

  1. Building foundations: Before constructing a building, soil compaction is performed to create a solid and level base for the foundation. This prevents uneven settling, which can cause cracks, misalignments, or even structural failure in the long term.
  2. Road construction: In road construction projects, soil compaction is essential to provide a stable and durable base for pavement layers. Proper compaction ensures that the road can support the weight of vehicles and resist damage from traffic loads and environmental factors, such as freeze-thaw cycles.
  3. Embankments and earth fills: Compaction is crucial when constructing embankments, dams, or landfills, as it helps create a stable and well-supported structure. The process strengthens the soil and reduces the risk of slope failure, landslides, or settlement issues.
  4. Utility trenches: When burying utilities such as water, sewer, or gas lines, soil compaction is necessary to provide stable support around the utility lines and prevent damage or pipe failures.
  5. Retaining walls: Soil compaction is necessary to provide lateral support for retaining walls and prevent them from collapsing due to pressure from the retained soil.

Types of Soil Compaction Equipment

Rammer Compactors

Rammer compactors, also known as tamping rammers or jumping jacks, are a popular choice for compacting cohesive and semi-cohesive soils, such as clay and silt. These machines deliver high-impact force by pounding the soil using a piston-driven mechanism. This process effectively reduces air pockets and increases the soil’s density.

Rammers are typically used for compacting soil in narrow or confined spaces, such as trenches, and are useful for backfilling around utility lines or pipes. The Wacker Neuson BS60-2i is a great tool for this purpose. It can reach compaction depths of up to 20 inches, depending on the rammer model and soil type. In addition, the rammer’s compact size and high maneuverability make it an excellent option for residential projects, including the construction of patios, sidewalks, and small driveways.

Plate Vibratory Compactors

Plate vibratory compactors, or vibratory plate compactors, are best suited for granular soils like sand and gravel. These machines compact soil by applying both weight and vibration. The plate at the bottom of the machine vibrates and moves forward, compacting the soil beneath it. Plate vibratory compactors offer high compaction force and improved efficiency compared to rammers, making them a better choice for larger projects.

The depth of compaction achieved by plate compactors depends on factors such as the weight and vibration frequency of the machine, as well as the type of soil. Generally, these compactors can achieve compaction depths of up to 12 inches for sand and gravel, and about 6-8 inches for clay and dirt.

Plate vibratory compactors like the Wacker Neuson WP 1550 A, are widely used in paver installations, particularly for the sub-base and base layers, to ensure a stable foundation. These machines are also commonly used for constructing sidewalks, patios, and driveways, as they efficiently compact granular soils and provide a smooth, even surface.

Compaction Rollers

Compaction rollers, also known as roller compactors or simply rollers, are heavy machines equipped with large drums that roll over the soil surface to compact it. They are particularly effective for compacting large areas and are commonly used in road construction and other civil engineering projects. There are different types and sizes of compaction rollers, including smooth drum rollers, padded drum rollers, and grid rollers, each designed for specific soil types and compaction needs.

Padded drum rollers, like the Wacker Neuson RT82-SC-2, also known as sheepsfoot rollers, are designed for compacting cohesive and semi-cohesive soils like clay and dirt. are best suited for compacting granular soils like sand and gravel. It can typically compact soil layers up to a depth of approximately 2 feet (or about 60 cm).

Compaction Requirements in Paver Installations, Sidewalks, Patios, and Driveways

For paver installations, sidewalks, patios, and driveways, proper soil compaction is critical to ensure a stable foundation and prolong the lifespan of the construction. The following steps outline the general process for compacting soil in these projects:

  1. Excavation: Remove any topsoil, vegetation, or debris to expose the subgrade soil. The depth of excavation depends on the thickness of the paving material and the required sub-base and base layers.
  2. Subgrade compaction: Compact the exposed subgrade soil using the appropriate compaction equipment based on the soil type. Proper subgrade compaction is crucial, as it provides a stable foundation for the subsequent layers.
  3. Sub-base installation: Spread a layer of granular material, typically crushed stone, over the compacted subgrade. The thickness of this layer depends on the project requirements, local building codes, and soil conditions. Compact the sub-base layer using a plate vibratory compactor or a roller compactor, depending on the project scale and soil type.
  4. Base installation: Install the base layer, typically composed of compacted gravel or crushed stone. Compact this layer using a plate vibratory compactor or a roller compactor, as required. Ensure proper compaction and an even surface to provide a stable foundation for the paving material.
  5. Paving material installation: Lay the chosen paving material, such as concrete, asphalt, or pavers, over the compacted base layer. Ensure that the paving material is installed according to the manufacturer’s recommendations and local building codes.
  6. Final compaction: For paver installations, compact the pavers into the underlying base material using a plate vibratory compactor with a protective pad to prevent damage to the pavers. This step ensures proper interlocking of the pavers and improves the surface stability.

Choosing the Right Compaction Equipment

When selecting the best compaction equipment for your project, consider factors such as the type of soil, the size of the area to be compacted, and the desired compaction depth. Each compaction method and type of equipment is suitable for specific soil types and project requirements, and you can count on The Pro Group to provide you with best-in-class customer service as you make your decision. Get more information and prices on any product or service by requesting a quote

floor-grinder

How to Choose the Right Floor Grinder for Your Project

Floor grinders are essential tools for any flooring company or DIY enthusiast. They are used to grind and polish concrete floors, remove old coatings, and prepare surfaces for new coatings. In this article, we will give special attention to Husqvarna Floor Grinders and discuss what type of tasks the grinders are ideal for, as well as which grinding wheels produce top results. 

What is a Floor Grinder? 

A floor grinder is a powerful tool used for surface preparation and polishing of concrete floors. It uses rotating, highly abrasive metal disks to grind down high spots, remove sealers, coatings, and thin layers of concrete. Floor grinders are commonly used in indoor applications such as garages, kitchens, basements, and patios to prepare the surface before applying a new coating or polishing the concrete. They come in various sizes and types depending on the application and can be rented or purchased from specialized stores. 

How is a Floor Grinder Used? 

Here are some examples: 

  • Grinding and polishing concrete floors 
  • Removing old coatings such as paint or epoxy 
  • Preparing surfaces for new coatings 
  • Smoothing rough surfaces 
  • Leveling uneven surfaces 

Factors to Keep in Mind When Selecting a Floor Grinder 

Here are several factors to consider before making your purchase: 

  • Size and Power: Floor grinders range 
  • Type of Grinding: Some grinders are better suited for removing coatings or leveling uneven surfaces, while others are designed for polishing or honing concrete floors. 
  • Ease of Use: Look for a floor grinder that’s easy to operate and maneuver. Some models come with adjustable handles or swivel heads that allow for greater control and precision. 
  • Durability: Look for models made from high-quality materials that can withstand heavy use over time. 
  • Price: Price tags on floor grinders can vary greatly, ranging from a few hundred to several thousand dollars – depending upon their size and the number of features they offer. 

Types of Floor Grinders 

There are two main types of floor grinders: planetary and rotary. 

Planetary Floor Grinders 

A planetary floor grinder contains a large main plate that rotates in one direction, while three smaller plates rotate in the opposite direction. This unique design allows for efficient and even grinding of the surface. They are ideal for large surface areas and can be used to grind and polish concrete floors. 

Husqvarna offers several planetary floor grinders, including the PG 450, PG 820, and PG 530. 

The Husqvarna PG 450 is a versatile and user-friendly planetary floor grinder that can be used for a wide range of applications such as coating removal, concrete grinding, and polishing. Its planetary drive system ensures consistent and even grinding results, making it the perfect choice for both commercial and residential projects. 

The Husqvarna PG 820 is the perfect choice for industrial operations, thanks to its expansive grinding width of up to 32 inches. This floor grinder can be used for polishing and repairing concrete floors as well as terrazzo and other natural stones. With Dual Drive Technology™ and a revolutionary planetary drive system, this machine offers exceptional efficiency – even more so with the added convenience of remote operation in its RC version! 

The Husqvarna PG 530 is a powerful and efficient concrete floor grinder perfect for both wet and dry grinding tasks. It has high capacity, making it suitable for residential or light commercial use; furthermore, thanks to its triple-headed grinder as well as same direction planetary head and satellite discs, this tool can aggressively grind at fast rates while effectively extracting dust with the help of diamond segments. With all these features combined in one machine, you get amazing results every time! 

Rotary Floor Grinders 

Rotary floor grinders have one or more rotating heads that spin in a circular motion. They are ideal for smaller surface areas and can be used to remove old coatings or level uneven surfaces. 

The Husqvarna PG 280 SF is a single-disc floor grinder that is perfect for small to medium-sized concrete floor preparation tasks. With its compact design and easy maneuverability, it can be used for grinding concrete, removing coatings, and leveling uneven surfaces. The PG 280 SF features a single-phase motor with a frequency control drive and an adjustable handlebar for comfortable operation. It also comes equipped with a dust port for easy connection to a dust extractor, making it ideal for indoor use. 

Choosing the Right Grinding Wheel 

Husqvarna floor grinders are designed to be versatile and user-friendly, with a range of grinding wheels available to suit different applications. The most common type of grinding wheel used on Husqvarna floor grinders is the diamond grinding wheel. These wheels are made with industrial-grade diamonds embedded in a metal or resin matrix, which allows them to grind through tough materials like concrete and stone with ease. 

Whether you need to remove coatings and adhesives or polish and finish concrete surfaces, diamond grinding wheels are available in a wide array of shapes and sizes for any application. Some diamonds grinders provide aggressive removal power while others make it simple to achieve a perfect finish on your project. 

In addition to diamond grinding wheels, Husqvarna also offers a range of other accessories for their floor grinders, including polishing pads, abrasive discs, and scarifying tools. 

Browse our Concrete Floor Grinder Rentals 

Browse our selection of concrete floor grinder rentals which include models from Husqvarna and Edco. Still not sure which concrete floor grinder rental is right for you? Call The Pro Group at 1-888-776-0007 to speak with a representative who can help you select the concrete floor grinder rental that’s right for you. Rentals are available from one day to long-term. 

concrete-coring-rig

Choosing the Right Concrete Coring Rig and Bits for Your Project

Whether you are drilling wet or dry, working with reinforced concrete or pre-stressed slabs, it’s important to choose the right rigs and bits for the job. The Diamond Great White Core Bore Bit and drilling rigs from Diamond Products are designed specifically for this purpose – providing maximum performance and safety when drilling through concrete. In this article, we will discuss why these rigs and bits are ideal for any concrete coring project, as well as how to select them correctly so that you get the best results every time.

What is a Concrete Coring Rig?

A core drill is a heavy-duty power tool used to drill precise holes into concrete and other hard materials, such as masonry, brick, and natural stone. Concrete coring rigs typically consist of a motor, a drill column or boom, and a chuck that holds the drill bit. Some rigs are designed to be handheld, while others are mounted on a cart or a stand for greater stability during use.

Core drills are used for a variety of applications, including creating holes for pipes, ducts, and electrical wiring, making room for structural reinforcements and preparing surfaces for demolition or renovation. Concrete coring rigs are typically heavy-duty and more specialized than standard drill tools, as they are designed to handle the high torque and pressure required to cut through hard materials.

Wet and Dry Rigs

The primary difference between the two types of rigs is the way they handle the dust and debris generated during the drilling process.

  • A wet core rig uses a continuous flow of water to cool the drill bit and wash away the dust and debris generated during the drilling process. This helps to prolong the life of the drill bit and reduce the amount of dust and debris in the work area, making it a more suitable choice for larger and more complex coring tasks or for drilling into brittle materials.
  • A dry core rig operates without the use of water and generates a significant amount of dust and debris during the drilling process. This type of rig is typically used for smaller, simpler coring tasks or for drilling into materials that are not particularly brittle.

Diamond Products’ Drilling Rigs for Concrete Coring

The Pro Group can provide you with a quote on any of Diamond Products Core Drilling Rigs and accessories.

M-1 Complete Combination Core Drilling Rig

This is the number one selling rig in America and is great for the General Contractor.

The 2-1/2” square column is black oxidized for a modern look and features 6″ wheels to increase mobility. A dual switch/outlet control panel with an amp meter (excluding the CB700 models, which have an LED amp meter) allows you to customize settings while a vacuum pump ensures fast mounting without any anchor holes. 

Four leveling screws are included on the base plus up to 14 inches of bit capacity when using one spacer block! There’s even a slide handle for easy drilling in tight areas – choose from various motor sizes too!

M-4 Multi-Purpose Core Rigs

An ideal tool for the contractor, plumber, or electrician; this reversible slide handle drill allows you to use it with either your right or left hand. Constructed of hard anodized 1-5/8” x 2” aluminum column and equipped with a top carrying handle and quick-release motor mount, this lightweight, portable unit is designed for easy transportation.

It has four adjustable slide bearings providing superior carriage rigidity along with 4 leveling screws on the base. Setup is fast & effortless at any angle up to 45o – allowing you greater flexibility when drilling.

Different Types of Concrete Core Drill Bits

Two major types of core drill bits are commonly used in concrete: Diamond Core Drill Bits and Tungsten Carbide Core Drill Bits.

  1. Diamond Core Bits: A diamond core bit is made from industrial-grade diamonds and is the most commonly used type of bit for concrete coring. They are very effective at cutting through hard materials like concrete and provide a fast and efficient drilling process.
  2. Tungsten Carbide Core Drill Bits: Tungsten carbide core drill bits are made from a mixture of tungsten carbide and steel and are typically used for drilling through softer materials or for making small, shallow holes in concrete. They are less expensive than diamond core drill bits and are often used for simpler, less demanding applications.

Benefits of Using A Diamond Core Bit

This is a specialty turbo wet core bit for use in wet drilling applications. The Diamond Great White Core Bore Bit is a diamond-tipped drilling tool used for materials such as reinforced concrete, brick, and masonry. In a GWOL configuration, the bits are for fast coring in general-purpose concrete with medium aggregate and reinforcement. In the GWSL configuration, the application is fast coring in critically hard reinforced concrete with medium aggregate.

The Great White gets its name from the “shark Tooth” segments that are built-in. This unique diamond core bit design allows the dust and debris accumulated while drilling to escape, putting less stress on the bit. This gives the tool a long life and provides savings for you in the long run. It can be used on mounted core rigs (all sizes) and hand-held motors (3” and under).

Stock up on Core-Bore from Pro Tool & Supply

Not sure which Core-Bore rig or bit is right for your upcoming job? Request a Quote or call us at 1-888-776-0007  to speak with a Pro Tool & Supply representative for more information on our stock.

cracked-concrete

Unlock the Speed and Efficiency of Early Entry Concrete Saws

Are you looking for ways to speed up your construction projects? Early entry concrete saws can be the answer. These saws are special tools designed for cutting control joints into concrete, before the material has fully cured. This can help save time on projects that need to be completed quickly, as the time saved from not having to wait for full curing can be significant. In this blog post, we’ll explore the advantages of early-entry saws and the benefits of using the Diamond Products Early Entry Saw (CC150XL EE) and their blades.

Introduce Early Entry Concrete Saws

Early entry saws are designed to deliver powerful performance and maximum efficiency when cutting control joints into concrete, before the material has fully cured. These saws make it quick and easy to cut control joints with pristine edges in a fraction of the time – usually only one or two hours after concrete finishing. This is an ideal solution for preventing random cracking, which could be expensive for any contractor working in concrete.

What are Early Entry Control/Relief Joints?

Control joints are strategically placed lines of separation in concrete, which permit movements due to changes in temperature and also from drying shrinkage. In simpler terms, if your concrete does crack, you can influence where it will break apart. These cracks should be straight, instead of erratic or irregularly shaped.

Advantages of Cutting Control Joints

Saw-cutting joints are now commonplace for both residential and commercial floors, and the advantages are simple to see:

  • Making this cut controls where the cracks appear. When made correctly, any cracks will develop beneath the control cut.
  • Saw cuts are subtle on a finished floor, providing a stylish surface; transitions between paneled slabs become smoother without any trip hazards;
  • Forklifts travel more smoothly than with other control joint systems;
  • Plus, they require less frequent maintenance due to thinner lines that don’t need as much filling.

Diamond Products Early Entry Saw (CC150XL EE)

Built to cut quickly and efficiently, Diamond Products Early Entry saws are designed with a lightweight yet powerful spring box technology. This technology features a skid plate, which guards against chipping or spalling, which may otherwise compromise the finished product’s quality.

Additionally, this innovative design reduces dust levels associated with cutting operations. When paired with an appropriate dust collection system, these saws can almost entirely eliminate airborne particles! Used correctly, these remarkable tools will create beautiful end products that stand the test of time.

Outstanding Features and Benefits

This feature-rich saw ensures your cutting job is done quickly and efficiently:

  • Maximum cutting depth of 1-3/16”.
  • Honda GX160 motor.
  • Heavy-duty welded steel frame.
  • Telescopic handle to allow operator comfort.
  • Five wheel stabilizer system allows for smoothest operation possible on smooth or stamped concrete.
  • An added skid plate system makes it ideal for green concrete.
  • Cyclone air filter provides increased air flow.
  • Up cut design keeps debris away out of the joint.
  • A blade raise/lower mechanism featuring spring loaded release and single ribbed drive belt automatically sets the blade depth to 1 3/16″.
  • One-inch arbor will take various Diamond product blades.

Tips for Most Efficient Use of Early Entry Saws

  • When saw cutting control joints, it is essential to be aware of the slab thickness. For slabs that are 9″ or less in depth, you can typically cut up to 1” deep with an early entry saw – this not only saves time, but also reduces the need for joint filler! However, standard saws should always be used when the depth of a slab exceeds nine inches and must reach at least a quarter of its total thickness.
  • Typically, contractors wait 2-3 hours before sawing the concrete slab. For an easier method of assessing when to begin cutting, many opt for the “heel test.” This involves pressing their boot onto the surface, and then beginning sawing once they no longer see an impression left by their heel.
  • Before placing the saw on top of the slab, always verify that blade alignment is intact. A misaligned blade can be disastrous, as it can cut into the skid plate and potentially cause damage to your machine, while affecting a joint perpendicularity with respect to the slab’s surface. Avoid any catastrophes by double-checking your blades before using them!
  • Ensure that used blades are in proper condition: Examine all the diamond segments to ensure none of them have become overheated and glazed.
  • To get the most out of your new saw blades, initially cut at half speed for a length of 100 feet. This break-in period will extend blade life and ultimately provide you with faster cuts in the long run.
  • To keep your saw joints safe, avoid walking over them while cutting, and forbid access to the slab until the final set is complete. Moreover, when cleaning up cuttings, you should always move in line with the joint’s direction; sweeping across it could cause irreparable harm to its collar. Lastly, use joint protectors at both saw joint intersections and saw drive wheel sites for further security.

Using the Right Blade Makes the Project Go Smoothly

This dry-cut saw uses diamond blades to cut and grind through concrete slabs after they are poured or set, leaving smooth edges and a precise finish. The diamonds on the blade allow it to easily slice through reinforced concrete, while significantly reducing noise and dust associated with other conventional cutting methods.

When it comes to concrete cutting equipment, you can count on The Pro Group to provide you with best-in-class customer service as you make your decision. Get more information and prices on any product or service by requesting a quote. One of our experts will get back to you shortly.

skid-steer-loader

Things to Consider When Purchasing a Skid Steer Loader or Dumper

Are you in the market for a loader/dumper but don’t know where to start? With so many options, it can be difficult to decide which one is best for your needs. Whether you need a stand-on mini skid steer or powered mini dumper, there are a few key factors that should guide your decision-making process. In this article, we’ll discuss the most important considerations when purchasing a loader/dumper, and provide insight into why Pro Tool & Supply is the right choice for all your equipment needs.

Do you Need a Skid Steer Loader or a Dumper?

While both machines will dump their contents, their similarities end there.

Skid Steer Load/Dumper

Skid steer loaders/dumpers are incredibly useful pieces of machinery for so many projects. They are compact machines that provide immense power in a tiny package, making them popular among general contractors and DIY-ers alike. Skid steers can be fitted with multiple attachments depending on the job at hand, from scrapers and hoses to combine components and forestry mulchers. With its powerful hydraulics, the skid steer loader/dumper is an essential tool in any contractor’s arsenal to get the job done quickly and efficiently.

Powered Mini Dumper

A powered mini dumper is a strong and versatile machine that can be used for various tasks, from moving large quantities of materials to delivering parts around a job site. This type of dumper is typically small and highly maneuverable, allowing it to access areas that standard dumpers cannot reach. They can be powered by either a battery or gas engine, and feature adjustable speeds, allowing the operator to move at a comfortable pace. Ideal for contractors looking to save time on site with fewer workers, a powered pull behind mini dumper is an invaluable tool in any construction setting.

Key Factors to Consider When Choosing a Loader/Dumper

Advantages of a Skid Steer Loader

Compared to mini dumpers, the skid steer loader offers several advantages. Specifically:

  • It’s compact size makes it ideal for working in tighter spaces without sacrificing performance.
  • Large wheels allow for higher ground clearance than some mini dumpers offer.
  • The skid steer loader can be driven forwards and backwards with equal proficiency, allowing more agile maneuvering on uneven terrain.
  • Finally, many skid steer loaders offer attachments that enable the machine to take on various tasks, from removing dirt/concrete inside a commercial construction site to digging trenches, post holes, and jack hammering stone/concrete.

Advantages of a Mini Dumper

If you don’t need a machine that digs, the mini dumper:

  • Is smaller and more maneuverable, capable of navigating tight areas that a larger skid steer loader would have difficulty accessing.
  • Mini dumpers require less maintenance and fewer repairs, since their hydraulic systems are simpler and less complex.
  • Finally, as mini dumpers tend to be more affordable than skid steer loaders, they can be a great cost-effective solution for general contractors on a budget.

Best Options for Purchasing a Mini Skid Steer or Mini Dumper

SHERPA 100 Eco

Hanenberg Materieel Ltd. made history by being the first ever manufacturer to create an electric mini skid-steer – the SHERPA 100 Eco! This extraordinary machine has matching power and strength as its combustion engine counterpart, making it ideal for interior demolition or working in stables. With a modest 4.2HP electric motor located at its front, this compact loader offers 30″ of width while delivering incredible performance results.

Applying pressure to the accelerator rapidly accumulates power in the system. The area which typically holds a combustion engine now carries a 360-Ampere battery pack, enabling the mini skid-steer to operate for as long as 7 hours.

Twinca Powered Mini Dumpers

Twinca offers an extensive range of mini dumpers to suit all needs, from the small and compact models with lift capabilities and electric or gasoline engines, to larger, more robust versions.

Electric Dumpers:

  • have a carrying load between 1,100 pounds and 1,700 pounds.
  • They are easy to transport to the jobsite and simple to maneuver.
  • With a full charge, you can operate the dumper all day, and it will recharge in 4-5 hours.
  • The steering mechanism can be tailored to the height of its operator, allowing them to work in an ergonomically friendly position while minimizing physical strain.

Gas-Powered Dumpers:

Twinca offers two gasoline-powered models, the G-800 and the GS-800. Both offer:

  • A hefty carrying capacity of 1,700 pounds
  • Auto-steering to make it easier to move even in the most difficult terrain while lugging a heavy load, the G-800 is ideal for those who need something that requires minimal physical effort.
  • Adjustable speed controls allow you to set your own pace, and with lift capabilities ranging from 25″ up to 49″, this machine will have no problem getting the job done.

Regardless of which machine you need, you can count on The Pro Group to provide you with best-in-class customer service as you make your decision. Get more information and prices on any product or service by requesting a quote. One of our experts will get back to you shortly.

Ariens Snow Blowers

Anyone who has ever shoveled snow knows that it can be a backbreaking chore, especially if there is a lot of snow. Fortunately, there is a tool that can make the job much easier: an Ariens snow blower from Pro Tool & Supply. Snow blowers come in various sizes and styles, so there is sure to be one perfect for your needs. They are also relatively easy to operate, and they can quickly clear large areas of snow. In addition, snow blowers are versatile and can be used on both sidewalks and driveways. As a result, they are an invaluable tool for anyone who lives in a climate where snow is common. So if you are tired of shoveling snow by hand, consider investing in an Ariens snow blower.

snow-blower

How Do Snow Blowers Operate?

Snow blowers are essential tools for clearing snow from driveways and walkways. But how do they work? Most snow blowers have two augers, or rotating blades, that gather the snow and direct it into a discharge chute. An electric motor powers the augers or a gasoline engine. As the augers rotate, they pull the snow into the machine. The snow then passes through an impeller, or a series of blades, that throw the snow out of the discharge chute. Snow blowers come in different sizes and styles, but they all operate on the same basic principle. With a little practice, anyone can learn to use a snow blower to keep their property clear all winter long.

5 Things to Consider When Purchasing a Snow Blower

When it comes to winter weather, there is no such thing as being too prepared. One of the best ways to ensure that you are ready for whatever Mother Nature has in store is to invest in a snow blower. But with so many models on the market, it can be tough to know which one is right for the space you need to keep clear and safe this winter.

  1. The Ariens 32″ Professional Grade snow blower is perfect for those with large driveways or yards. The AX 420cc engine is easy to operate, and it can move a lot of snow- 91 tons per hour, to be exact! The auger housing is also 32″, making quick work of any accumulation. Some other features include an LED headlight, hand warmers, remote deflector, and commercial-grade skid shoes.
  2. For medium-sized properties, the Ariens Deluxe 28″ and 30″ models offer premium features on a snow blower that tackles the big jobs, but is still easy to maneuver and easy on the budget. Both models feature Auto-Turn and electric starting, as well as an LED headlight. The 30″ moves 71 tons of snow per hour, and will throw the snow up to 50′ away, and has heated hand grips. The 28″ will remove 65 tons of snow per hour.
  3. If you like a smaller machine, but still need the high output, consider Ariens Platinum Series. The dimensions of these models are comparable to the Deluxe line, with Super High Output impellers that can toss up to 83 tons of snow per hour as far as 55 feet. Furthermore, cast-iron gear cases generate a favorable auger ratio compared to other brands in the industry and also require less maintenance–allowing Ariens 5-year warranty, one of the longest periods offered by any company. Heated hand grips reduce freezing and discomfort for users, so they have more control during longer operating sessions.
  4. If you’re only looking to clear a small area like a sidewalk or short driveway, the Path Pro 21 is your best bet. It can throw 57 tons of snow per hour and clean it down to the pavement. Plus, it offers electric and recoil starting options, and has a folding handle for easy storage.
  5. If you live in an area that receives above average snow fall, and you have to deal with high snow piles or hilly terrain, the Ariens track snow blower offers substantial traction under almost any conditions. These models are available in 24″, 28″ and 32″, moving up to 90 tons of snow an hour.

Regardless of your snow removal needs, The Pro Group has you covered. Shop Ariens snow blowers or call 1-866-405-2985 to speak with a Pro Tool & Supply representative for more information.

Insulated Tarps vs Heated Concrete Blankets

When working in cold weather conditions, it is important to take measures to prevent heat loss. Insulated tarps and heated concrete blankets are both effective means of doing so, but have different advantages and disadvantages. Heated concrete blankets provide direct heat to materials, curing them much faster than insulated tarps. Additionally, blankets are (Electrical Testing Laboratories (ETL) certified to high electrical standards, making them safer for use in cold weather concreting.

concrete

Why Does Concrete Need Heat?

Concrete needs to cure within the temperature range of 65°- 85° F; otherwise, ice crystals will form and weaken the concrete. If this happens, construction project progress will come to a halt, as repairs or re-pours need to be carried out.

At first, it may seem appealing and budget-friendly to only insulate concrete during the curing process. However, this can lead to costly time delays and reworks. Insulated tarps placed at the point of pouring will protect against heat loss and help maintain warmth after the pour is finished.

What is an Insulated Tarp?

Insulated tarps are used to prevent heat loss in cold weather conditions. They are made from durable materials that can withstand the elements, but they cannot provide direct heat to materials like heated concrete blankets.

Insulating tarps help regulate temperature during construction projects, which is essential to maintaining the curing process and final strength of concrete. Tarps are often one of the first solutions considered when facing cold weather conditions.

How Do Insulated Tarps Work?

By trapping an air layer, insulated tarps work to slow down the rate of heat loss. This is beneficial, because it means concrete will cure faster if exposed to higher temperatures, compared to concrete curing in cold temperatures.

While this does not stop all heat loss, it provides some protection for materials in cold weather. Insulated tarps are used on concrete walls and slabs, concrete forms, bridge beams, scaffolding, construction projects, pre-casting, and also as ground heaters.

Types of Insulated Tarps

Many tarps on the market are made with cheaper materials to cut down on manufacturing costs. However, a high-quality tarp will be made of more durable material that can withstand all types of weather conditions. There are two types of insulated tarps: polyester and closed-cell foam. Polyester is less expensive to produce, but breaks down faster when exposed to sunlight. Closed-cell foam, on the other hand, is the best insulation because it has trapped foam bubbles that prevent heat or moisture from passing through.

In summary, insulated tarps are made for quick fixes and are not a long-term solution for material warming and cold weather mitigation. Tarps aren’t meant to last more than a few uses, and cannot provide additional heat when needed. 

The advantages of insulated tarps are as follows:

  • Significantly decreased heat loss compared to not using a tarp.
  • An initial barrier against rain and snow, though the tarp will likely degrade after prolonged exposure to bad weather conditions.
  • Easy installation and removal.

Drawbacks of Insulated Tarps:

  • Plastic tarps are especially vulnerable to sunlight damage. The ultraviolet light in sunlight will degrade the tarp and reduce its protective abilities.
  • Wind and dust can also damage insulated tarps, wearing away at the surface and edges until it tears. Most tarps are only water-resistant, so any tears will allow water to leak onto sensitive materials or equipment.
  • Insulated tarps don’t provide heat retention capabilities.

Electric Concrete Blankets Offer Better Protection Than Tarps

What is an Electric Concrete Blanket?

Electric concrete curing blankets are a better solution for curing concrete in cold weather conditions. An electric concrete blanket is a device that applies heat directly to curing concrete, accelerating the process and ensuring a high level of quality. Unlike insulated tarps, electric concrete blankets provide a consistent heat source that does not dissipate over time. They are more durable than insulated tarps, and can be used multiple times without degradation.

Proper Cure Time is Vital for Optimum Concrete Strength

Several elements determine how long concrete will take to set and become strong, including the mix used, the ambient temperature, and the size and shape of the slab. Of all these variables, weather is the most difficult to predetermine. In general, colder temperatures lengthen concrete’s setting time.

A regular non-electric insulated blanket will make concrete take longer to set during colder weather, resulting in weaker concrete. For example, if concrete is kept at 70°F, it will usually set within 6 hours. However, if it’s kept at 40°F, the setting process will take approximately 14 hours. Additionally, concrete maintained at 70° F enables a compression strength of 2,700 psi in only 3 days. Similarly, maintaining concrete at 40° F typically yields a much lower strength of 1,200 psi in just three days.

The strength of the concrete mixture is integral to proceeding with your construction project. If it takes too long to set and cure, you will experience costly delays. Some manufacturers have a difficult time operating during the winter months, which can further complicate things.

Other Uses for Concrete Blankets

Concrete blankets can be used for more than curing concrete.

  • Heat the ground:
  • Makes digging and trenching easier.
  • Prevents slipping, skidding, and falling.
  • Great to use before laying pavers or other stonework.
  • Maintain material above freezing temperature:
  • Prevents liquid material from separating or congealing.
  • Keeps shingles, gravel, and sand from freezing and sticking together.

Winter Weather Doesn’t Have to Stop Concrete Work

Some contracts require you to work through the cold as long as possible. Heated concfrete blankets and insulated tarps can help you get through those tough times. We carry a great selection of both. Our representatives are ready to help you heat all your winter jobs. Request a quote or call us at 1-844-671-2956 to learn more about our complete selection of construction heaters.

Search For Products

Product has been added to your cart